Installing Debian on QNAP TS-109
Overview
In a nutshell, the installation of Debian on your QNAP TS-109 works like this: you use the QNAP firmware to write a Debian installer image to flash. When you restart your device, Debian installer starts and allows you to login via SSH to perform the installation. Debian will be installed to disk and a Debian kernel will be put in flash that will start Debian from disk.
If you follow this procedure, Debian 9 (stretch) will be installed to your SATA disk and the QNAP firmware on disk and in flash will be replaced with Debian. Debian does not install a web interface to configure your machine, although it's possible to install such software. If this is not what you want, please don't proceed with the installation.
As of Debian 10 (buster), no installer is provided for the QNAP TS-109 because the installer no longer fits into flash memory. Therefore, you have to install Debian 9 (stretch); afterwards you can upgrade to Debian 10 (buster).
Requirements and Preparation
In order to install Debian on a QNAP TS-109, you need the following:
- A QNAP TS-109, TS-109 II, TS-109 Pro or TS-109 Pro II.
- An internal SATA disk in the TS-109.
- A network connection.
- Another machine on which you have a telnet and an SSH client. Telnet is included in Linux and Windows. SSH is included in every Linux distribution as OpenSSH and there is PuTTY for Windows.
Making a Backup
You have to make a backup of all the data stored on your TS-109 before
starting with the installation of Debian since Debian will format the whole
disk during the installation. Also, Debian will replace the QNAP firmware
in flash, so it's also recommended to make a copy of the flash partitions
mtd1, mtd2 and mtd3. Debian will only modify the first two
partitions but it's good to keep a copy of these three since they are
needed to create a recovery image for the QNAP. More detailed instructions
for making a backup of your flash partitions will be given later.
Installing the Recovery Mode
QNAP recently added a recovery mode to the boot loader on QNAP devices that can be used to write a backup image to flash. This is useful in case there are problems during the installation or upgrade of Debian. Since this recovery mode is very new, it's unlikely that it's already installed on your QNAP. Please follow the instructions given on the recovery mode page to install the recovery mode before proceeding with the installation of Debian!
Starting the Installer
There are two slightly different ways of putting the Debian installer on your TS-109 depending on whether you have installed the full QNAP firmware. The QNAP TS-109 only comes with a minimal Linux system in flash and requires an installation to disk for additional functionality. However, this installation requires the QFinder application that is only available for Windows and Mac.
Fortunately, it's possible to put Debian on your QNAP even if you have not used QFinder to initialize the hard drive. First, we will describe how to prepare your TS-109 for the installation of Debian if you have installed the full QNAP firmware with QFinder. Then we will describe how to do it if you haven't.
Preparing Your Fully Initialized System
First of all, you have to activate remote login so you can login to your TS-109 with telnet. Use the QNAP web interface and follow these steps (there is a separate page showing how to activate remote login with some screenshots):
- Click on Administration and enter the password (by default the
user is
adminand the password is alsoadmin). - Click on Remote login under System Tools or under Network Services (depending on the version of the QNAP firmware).
- Enable telnet, leave the port they use (13131) and press apply.
Now that telnet is running, you can connect to your TS-109 with the following command:
telnet 192.168.1.139 13131
You have to replace 192.168.1.139 with the actual IP address of your
TS-109. 13131 is the default port used by the TS-109 for telnet. Use
admin as the login name and admin as the password.
Here is a transcript of the login process:
telnet 192.168.1.139 13131
Trying 192.168.1.139...
Connected to 192.168.1.139.
Escape character is '^]'.

NASAC72F3 login: admin
Password: admin (password not displayed)
[~] #
Once you are logged in, you can save the content of your flash partitions to disk with these commands:
cd /share/HDA_DATA/Public
cat /dev/mtdblock1 > mtd1
cat /dev/mtdblock2 > mtd2
cat /dev/mtdblock3 > mtd3
This will put mtd1, mtd2 and mtd3 in the Public share, so
you can easily copy them to your PC.
You can skip the next section and download the installer.
Preparing Your Uninitialized System
Putting the Debian installer on an uninitialized QNAP system is pretty similar, but there are two main differences: First, telnet is enabled by default so you don't have to enable it yourself. Second, there is no network share, so you have to copy the backup of the flash content to a USB stick.
Turn on your TS-109 and wait a few minutes until it has started. The machine will make one beep, then there is a brief delay which is followed by three long beeps. The system is ready now and you can connect with telnet. The QNAP device uses DHCP so you have to replace the IP address in the following example with the IP address obtained by your QNAP:
telnet 192.168.1.139 13131
Trying 192.168.1.139...
Connected to 192.168.1.139.
Escape character is '^]'.

NASAC72F3 login: admin
Password: admin (password not displayed)
-sh: id: command not found
-sh: reset: command not found
[~] #
You have to format a USB stick with the ext2 filesystem. This is because
the uninitialized QNAP system does not contain the VFAT modules.
When you connect the USB stick, it will automatically be mounted on the
system. In my case, it was mounted at /share/external/sdi but you can
find the location with the following command:
mount | grep external
/dev/sdi1 on /share/external/sdi type ext2 [...]
Now go to this directory and make a backup of your flash partitions:
cd /share/external/sdi
cat /dev/mtdblock1 > mtd1
cat /dev/mtdblock2 > mtd2
cat /dev/mtdblock3 > mtd3
cd
umount /share/external/sdi
Disconnect your USB stick from your TS-109, connect it to your PC and to
add the files mtd1, mtd2 and mtd3 to your regular backup.
Now you can go ahead and download the installer.
Download and Flash the Installer
You can download the Debian installer images from the web using the following commands:
mkdir /tmp/debian
cd /tmp/debian
busybox wget http://archive.debian.org/debian/dists/stretch/main/installer-armel/current/images/orion5x/network-console/qnap/ts-109/flash-debian
busybox wget http://archive.debian.org/debian/dists/stretch/main/installer-armel/current/images/orion5x/network-console/qnap/ts-109/model
busybox wget http://archive.debian.org/debian/dists/stretch/main/installer-armel/current/images/orion5x/network-console/qnap/ts-109/initrd
busybox wget http://archive.debian.org/debian/dists/stretch/main/installer-armel/current/images/orion5x/network-console/qnap/ts-109/kernel
This will download the Debian kernel, the installer ramdisk and a script to write the kernel and ramdisk to flash. You can now run the script by executing the following command:
sh flash-debian
Please note that this command will take about a minute to run. You will see the following on your screen:
Writing debian-installer to flash... done.
Please reboot your QNAP device.
Once the command has completed, you can shut down or reboot your TS-109. When you turn the TS-109 on again, the Debian installer will start.
The Installation
After you have flashed the Debian installer image and restarted your QNAP device, the Debian installer will start. Since the TS-109 does not have any IO device, SSH will be used for the installation. The installer will bring up the network, start the OpenSSH server and you can then connect to the device using SSH. You have to wait a few minutes after starting the system before you can connect. When the installer is ready, the status LED will change to solid green and your device will beep briefly to indicate that you can now login via SSH. (Note: there's currently no beep due to a bug; just wait about 1-2 minutes and connect with SSH.)
- If your QNAP firmware is configured to use DHCP (the default configuration from QNAP), Debian installer will try to acquire an IP address with DHCP. If you have not initialized your QNAP firmware with QFinder, DHCP will be used. You can use the MAC address of your TS-109 to tell your DHCP server to give out a specific IP address to your machine.
- If you configured a static address in your QNAP firmware, this configuration will be used. However, if your network configuration was incomplete (e.g. IP address or DNS were missing), the installer will use DHCP instead.
- If DHCP is used but your DHCP server does not respond, the TS-109 will
use the fallback address
192.168.1.100. If you are unsure what the address of your TS-109 is, unplug the Ethernet cable, start the machine again, wait until Debian installer is ready for SSH and then plug the cable back in and connect to this fallback address.
install. The user is installer. Connect to the installer (again,
replace the address in the example with the actual IP address of your
TS-109):
ssh installer@192.168.1.100
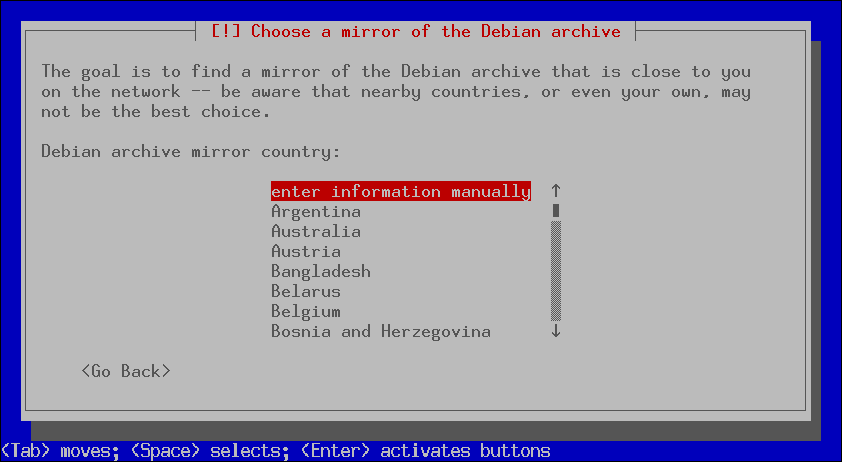
When the installer starts, it will ask you to choose a mirror of the Debian
archive. Since Debian 9 (stretch) is no longer distributed on Debian
mirrors, you have to tell the installer to install from
archive.debian.org. First of all, scroll up in the list of countries
until you find the first option, which allows you to enter information
manually:
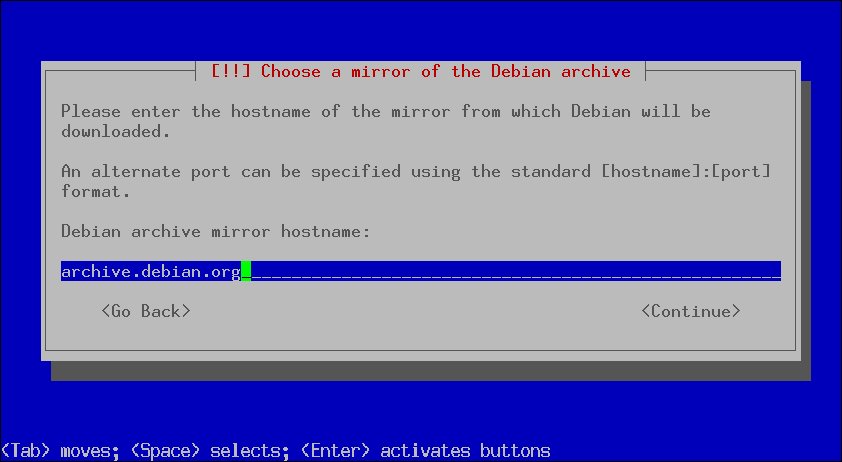
Enter archive.debian.org as the mirror hostname:
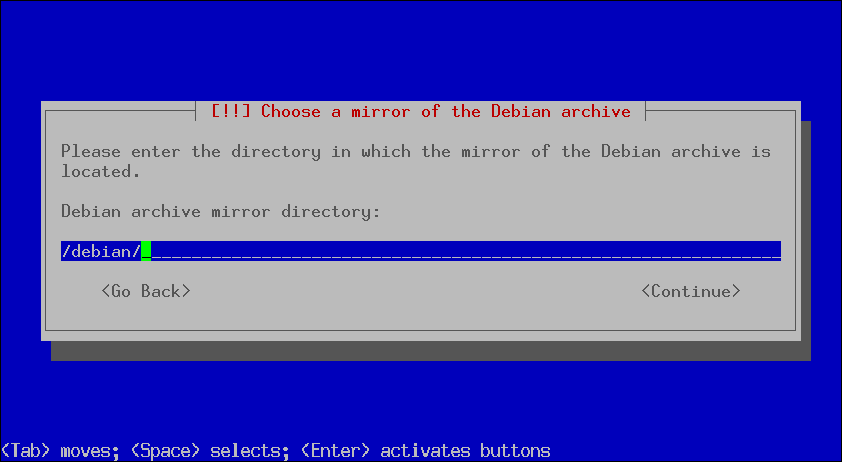
And accept /debian/ as the mirror directory:
Apart from this, the installation itself should be pretty standard and you can follow the installation
guide. The installer knows about the TS-109 and at the end of the
installation it will flash a kernel and ramdisk that will automatically
boot into Debian. It will also install the qcontrol package that can be
used to control the LEDs and beeper on your QNAP device.
Since the TS-109 boots from flash you don't have many limitations as to how you partition your hard drive. However, do not use RAID or LVM for your partitions. The TS-109 has a small partition for the ramdisk in its MTD flash and the Debian 10 initramfs will not fit if you use RAID or LVM.
At the end of the installation, the installer will write the new kernel to
flash. Afterwards you will get a confirmation that the installation is
complete. Confirm, wait for the installer to finish and once your SSH
session terminates, wait a few minutes before you can connect to your newly
installed system via SSH. The TS-109 will beep when you can connect via
SSH. You will be able to log in your newly created user. (Note that
root logins as disabled by default.)
It's possible that you'll get an error during the "make the system bootable" step. If you run into this issue, you can apply a workaround.
Success
You should now have a complete Debian system running on your QNAP. You can
use apt and other tools to install additional software. The TS-109
is an ARM based device and the armel architecture is fully supported by
Debian.
Now you can follow the release notes and upgrade to Debian 10 (buster). However, please be aware that security support for Debian 10 stopped in September 2022.
In case you run into any bugs or problems, you may want to check the list of known issues and bugs with Debian on the QNAP TS-109.