Debian on MIPS based Cobalt machines
This page describes how to install Debian 7 (wheezy) on a Cobalt machine. Please note that Cobalt machines are no longer supported in Debian 8 (jessie) or later releases.
Requirements
In order to install Debian 7 (wheezy) on a Cobalt machine, you need the following:
- a MIPS based Cobalt machine (RaQ1, Qube2, RaQ2, Gateway Microserver) with at least 48 MB memory. Please note that the Qube 2700 (Qube 1) is not supported.
- another machine (called the server from now on) on which you can install an NFS and a DHCP server.
- An Internet connection to which your Cobalt machine is connected.
Preparing the server
First, you have to install an NFS and DHCP server. While I will
demonstrate in the following how to configure these services on a Debian
machine, there is no special requirement that these services run on Debian.
Any NFS and DHCP server will do as long as they are connected to the
Internet, and they don't even have to be on the same machine (but in this
case, DHCP's next-server variable has to point to the NFS server).
In order to install NFS and DHCP packages, issue the following commands as
user root:
apt install nfs-kernel-server
apt install isc-dhcp-server
Secondly, you have to configure the NFS and the DHCP server. You have to
tell the NFS server to export a directory so the Cobalt can later access
it. Edit the /etc/exports file and add a line like this:
/nfsroot 192.168.1.0/255.255.255.0(ro,fsid=0,sync,no_subtree_check)
The value 192.168.1.0 has to be adapted according to the settings of your
internal network. Please note, however, that the firmware expects the
files to be in /nfsroot so please do not change this path. Also make
sure that the IP address of your NFS server is listed in /etc/hosts,
otherwise the Cobalt might fail to access the server via NFS.
After you've configured NFS, you have to configure your DHCP server. Edit
/etc/dhcp/dhcpd.conf and add an entry similar to the following:
option domain-name-servers 192.168.1.1;

subnet 192.168.1.0 netmask 255.255.255.0 {
       range 192.168.1.10 192.168.1.100;
}

host cobalt {
    hardware ethernet 00:10:e0:0:be:5e;
    fixed-address 192.168.1.67;
    option routers 192.168.1.1;
    next-server 192.168.1.1;
    option root-path "/nfsroot";
    filename "default.colo";
    option host-name "cobalt";
}
You have to adapt various values: you can choose your own host name, the
value of fixed-address will be the IP address of your Cobalt machine;
next-server should refer to the IP of the NFS server. You might also
have to specify the interface for the DHCP server to listen on in the
/etc/default/isc-dhcp-server configuration file. Finally, you need the
MAC address of your Cobalt for the hardware Ethernet value. This is
important to associate your machine with this entry in the configuration
file. First, start the following command on your server (you need the
tcpdump package for this) and make sure that you listen on the network
interface the Cobalt is connected to.
tcpdump -e -i eth1
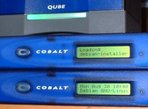
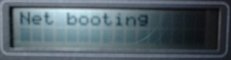
Then, start your Cobalt machine and activate network booting by pressing
the left and the right cursor button on your Cobalt at the same time. The
LCD should show Net booting. If it says Starting up then you were to
slow and it is booting from disk. Turn it off and try again. Once it is
trying to boot from the network, your tcpdump should show entries like
the following. The second value is your MAC address. Once you have found
the MAC address, you can turn the Cobalt off again.
23:49:02.001492 0:10:e0:0:be:5e Broadcast ip 406: 0.0.0.0.bootpc > 255.255.255.255.bootps: xid:0x61e38099 secs:5 file ""[|bootp]
Now, download and install the actual files needed for the installation:
cd $HOME
wget http://ftp.nl.debian.org/debian/dists/wheezy/main/installer-mipsel/current/images/cobalt/nfsroot.tar.gz
cd /
tar -xzvf ~/nfsroot.tar.gz
Finally, restart the NFS and DHCP server to activate all changes you have made:
/etc/init.d/nfs-kernel-server restart
/etc/init.d/isc-dhcp-server restart
Installing Debian
Now it's time to start the installation of Debian. Start your Cobalt and
immediately press the left and right button at the same time. This will
enable net booting and you should see Net booting on the display.
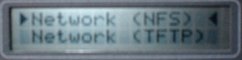
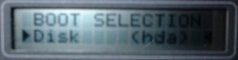
After a few moments you will get a boot menu on the LCD. Use the cursor
key to go to Network (NFS) and press the e (enter) button. Please note
that the boot menu has an automatic timeout after which it will attempt to
boot from disk (which won't work at this point). If you get a Unit boot
failed message on the LCD, please turn your Cobalt off and activate net
booting again and then select Network (NFS).
You will then be able to choose whether you want to do the installation via SSH or by connecting a serial console. Choose one of the options and continue with the installation as follows:
- SSH: wait a few minutes for the installer to start and bring up SSH.
Once it has brought up the SSH server, it will show the IP address, SSH
host key and installer password on the LCD of your Cobalt. Connect to the
IP address that is shown with SSH as the user
installerand start the installer menu. If no IP address is shown, your DHCP server is not configured properly to send all information the Cobalt needs, such as hostname and DNS. - Serial console: connect the null modem cable to the serial port of your
Cobalt machine and start a terminal emulation program (such as minicom, cu
or screen) with the settings 115200 8N1 (for example,
screen /dev/ttyS0
115200
).
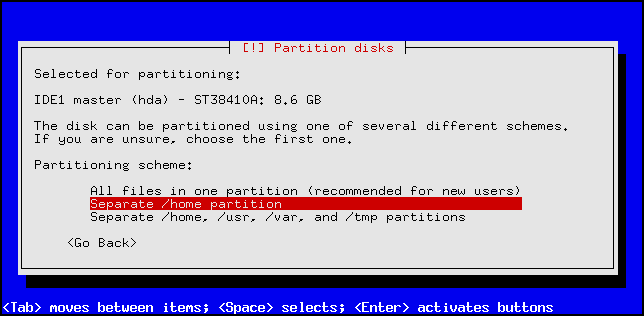
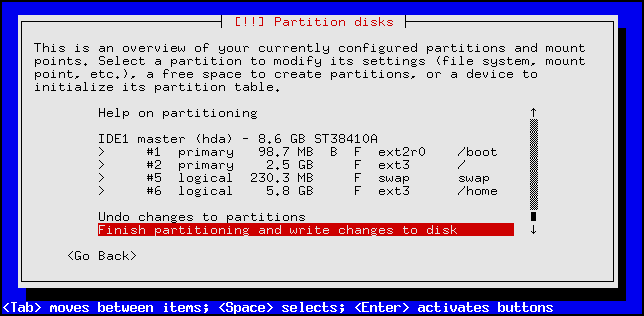
The installation itself should be pretty standard and you can follow the installation
guide. The only thing you have to keep in mind is that the Cobalt
requires a boot partition of type ext2 (revision 0). This partition has to
be the first primary partition. In debian-installer, you can make such a
partition by choosing the ext2r0 type. Basically, you have two options:
you can either have your root and boot partition on one partition (in which
case it has to be the primary partition and be of type ext2r0) or you can
have them on separate partitions (in which case the boot partition has to
be the first primary partition and has to be of type ext2r0, and your
root partition has to be any primary partition). The second way is
preferred because it allows you to use a modern file system (like ext3) for
your root partition (only ext2 and ext3 are allowed since XFS and ReiserFS
are not compiled into the kernel).
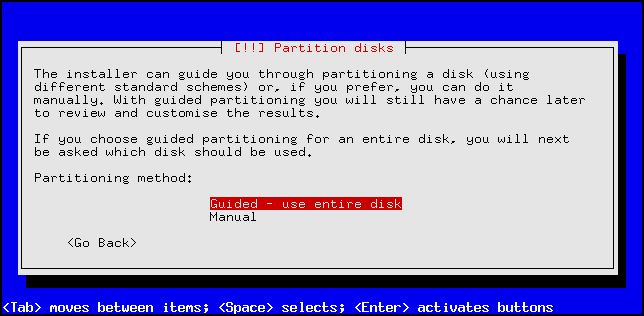
The best solution is not to worry about making the partitions yourself but use guided partitioning option in the Debian installer. It knows about Cobalt and will create a proper boot partition for you.
The installation will install CoLo, a boot loader written by Peter Horton, on your boot partition. This will not replace your existing firmware boot loader, but instead the firmware will load this boot loader which in turn will start Linux. CoLo has many features the firmware boot loader does not have and doesn't have any of the firmware's restriction.
When the installation is done, it will reboot. The firmware will automatically start CoLo from your boot partition. It will display a boot menu on the LCD, and by default start Linux from disk after a few seconds if you don't press a key.
When Debian has started, you can log in via SSH or the serial console depending on how you did the installation.